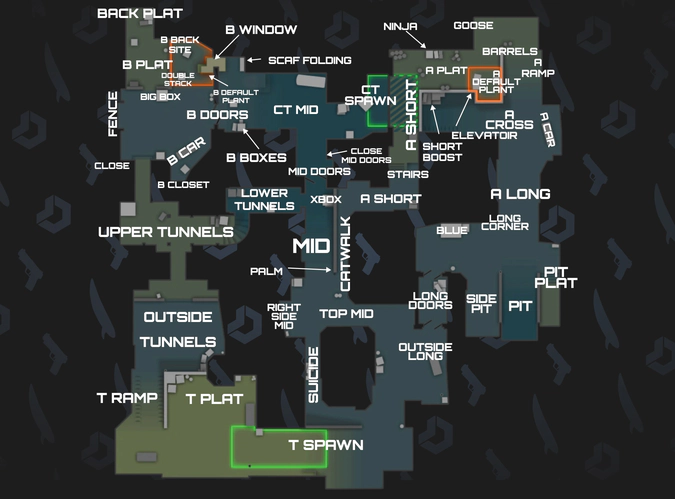
Understanding Dust 2: Key Strategies for Every Competitive Match
Understanding Dust 2 is crucial for players aiming to elevate their game in competitive matches. This iconic map is characterized by its balanced design and variety of tactical opportunities. To dominate on Dust 2, it's essential to master key areas: Mid, Long A, and B Tunnels. Controlling Mid not only provides valuable intel but also allows for strategic rotations between sites. In addition, remember to utilize smoke grenades effectively to block enemy vision, especially when crossing dangerous choke points.
Another important strategy on Dust 2 is communication with your teammates. Coordinate your movements and callouts to ensure everyone is on the same page. For example, when pushing Long A, a standard tactic is to throw flashbangs to disorient enemies before engaging. Use the following tips to enhance your gameplay:
- Prioritize economy management to ensure you have the right weapons and utilities.
- Utilize off-angle positions to catch opponents off guard.
- Keep track of enemy rotations to anticipate their next moves.
Counter-Strike is a highly popular first-person shooter series where players engage in team-based combat. The game is known for its competitive nature and deeply strategic gameplay. Players often seek unique and rare items, including the most expensive CS2 knife, which can significantly enhance their gaming experience.
Top 10 Tactical Spots in Dust 2: Gain the Upper Hand
In the highly competitive realm of Counter-Strike: Global Offensive, map knowledge is crucial for gaining the upper hand, and Dust 2 is no exception. This iconic map offers countless tactical opportunities for players willing to explore its every corner. Whether you’re playing as Terrorists or Counter-Terrorists, utilizing the right spots can turn the tide of battle. Here, we’ll delve into the top 10 tactical spots in Dust 2 that can elevate your gameplay and keep your opponents on their toes.
1. Long A - A vital area for taking control early in the game.
2. Catwalk - A sneaky pathway to A site that catches enemy players off-guard.
3. Mid - The heart of Dust 2; controlling this area allows for a strategic advantage.
4. Lower B Tunnels - Perfect for surprise attacks.
5. Upper B Tunnels - Offers quick access to the B site.
6. CT Spawn - A critical defensive position that needs to be secured.
7. Goose - Ideal for hiding and taking down enemies who push A site.
8. Elevator - Provides a unique vantage point for snipers.
9. Box on B - Great cover for defending against rushes.
10. Back site A - A safe spot for planting and defending the bomb.
Common Mistakes to Avoid on Dust 2: Improve Your Gameplay
When playing on Dust 2, avoiding common mistakes can significantly improve your gameplay. One of the main errors players make is neglecting map control. It's essential to understand the layout and control key areas such as Mid, Long, and Catwalk. Ignoring these zones can leave your team vulnerable. Always communicate with your teammates and strategize how to secure these areas early in the round. This not only enhances your chances of winning but also keeps the enemy team on their toes.
Another mistake to avoid is poor economy management. In Dust 2, running out of money can cripple your team's chances of success. Make sure to analyze your team's economy regularly, and only purchase weapons and utility that your team can afford. As a rule of thumb, aim to maintain a balance between offense and defense. Use eco rounds wisely to build up your funds and never underestimate the impact of a well-timed buy. Remember, a cohesive team effort in managing your economy can be the key to dominating the match.