Top 10 Hidden Spots on Dust 2 That Every Player Should Know
Dust 2 is one of the most iconic maps in Counter-Strike history, renowned for its balanced gameplay and strategic depth. However, among the bustling streets and bombsites, there are hidden spots that can give players a significant advantage. Understanding these areas can turn the tide of a match, allowing players to surprise opponents or gain a tactical edge. Here are the top 10 hidden spots on Dust 2 that every player should know:
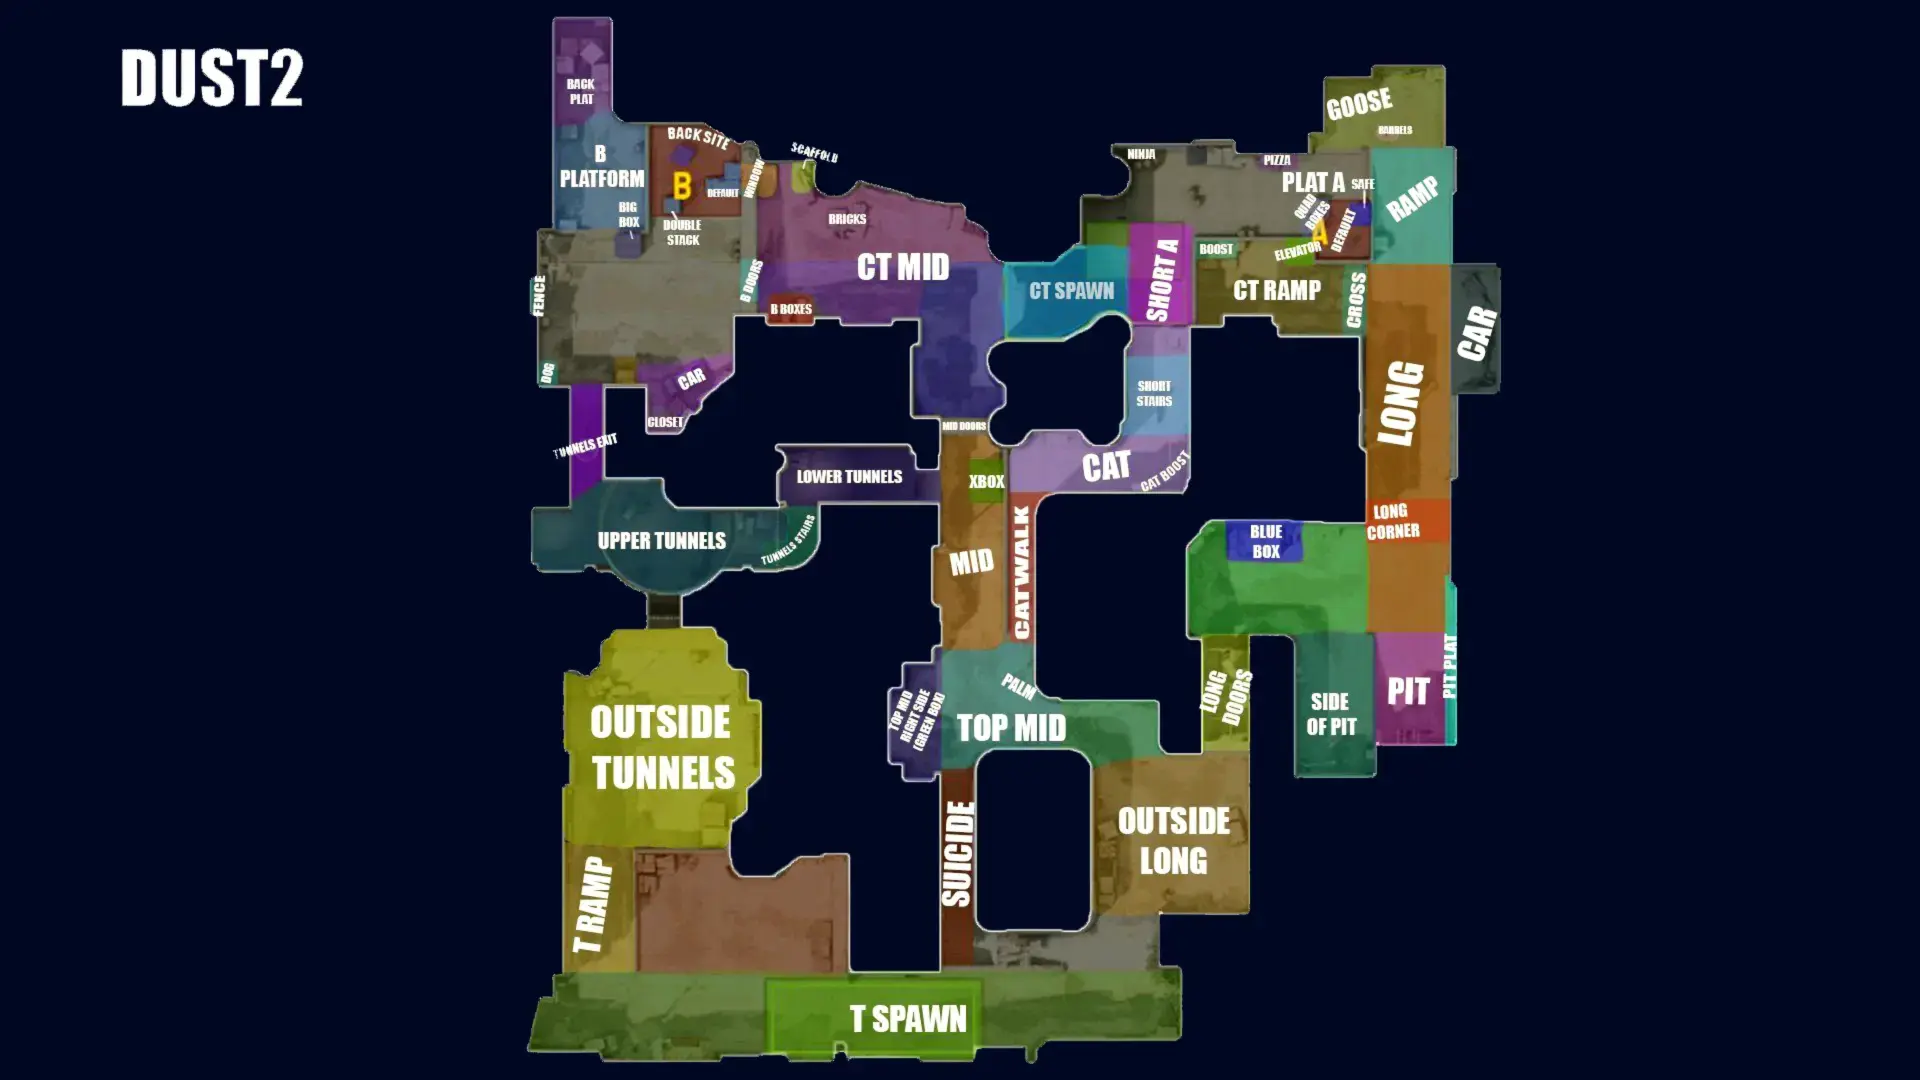
- Upper B Tunnels: A strategic vantage point where players can catch enemies off guard as they enter B site.
- Long A Pit: This spot provides excellent cover and a great line of sight for snipers targeting long A pushes.
- Double Stack Boxes on A Site: A great hiding spot for players looking to ambush attackers.
- Catwalk: This area can be utilized for quick flanks and surprise attacks.
- Back of A Site: Often overlooked, this position allows players to hold angles and surprise enemies attempting to plant.
- Mid Doors: Crouching behind these doors can catch players off guard as they push through mid.
- CT Spawn: Perfect for rotating and flanking enemies who are busy at B site.
- Top of T Ramp: A high ground advantage for players contesting A pushes.
- Bomb Carrier’s Hiding Spot: Knowing where to hide as the bomb carrier can change the whole game's dynamics.
- Goose: An iconic but sometimes ignored spot that provides excellent cover on A site.
Counter-Strike is a popular first-person shooter game that emphasizes teamwork and strategy. Players can acquire various skins and items, such as the chroma 3 case, to customize their in-game experience. The game's competitive scene has made it a staple in esports, attracting players and fans worldwide.
Mastering Dust 2: Essential Strategies for Competitive Play
Dust 2 is one of the most iconic maps in competitive play, and mastering it requires a blend of skill, strategy, and teamwork. Whether you’re an experienced player or just starting, understanding the layout and key positions is essential. Familiarize yourself with common callouts such as ‘A Site’, ‘B Site’, and mid-control areas to enhance your communication with teammates. Additionally, make sure to practice smokes, flashes, and other utility usage to gain control and secure advantageous positions during matches.
Another critical aspect of Dust 2 is the economy management. Players should keep track of their team’s finances to make strategic buys, ensuring they have the right equipment for each round. Consider the following tips for optimal economy management:
- Always buy armor and the best gun you can afford at the start of a round.
- Avoid forcing buys if the team can’t afford adequate utility or weapons.
- Communicate with teammates about saving or buying together to maintain team strength.
By implementing these strategies, you’ll elevate your game on Dust 2 and enhance your chances of success in competitive matches.
What Are the Most Effective Tactics for Dust 2's A and B Sites?
Dust 2 is one of the most iconic maps in competitive gaming, and mastering the A and B sites is crucial for success. To effectively secure the A site, players should focus on using smoke grenades to block off Common A site angles, such as the CT spawn and upper A. Deploying flashes also helps disorient enemies holding tight positions. Coordinating with your team to execute a well-timed rush can overwhelm defenders, especially if you utilize a split approach from both long and short A. Additionally, having at least one player hold flanks can ensure no sneaky plays from the opposing team.
On the flip side, taking control of the B site requires a different set of tactics. Starting with the B tunnels, teams should send a player to scout and throw utility to block off sight lines from the site. The use of pre-placed smokes to obscure vision from the bomb site can create openings for a decisive entry. It's also essential to manage crossfire situations, so having players coordinate their positions—one holding from the back of the site and another on the side—can help secure firm control. Remember, communication is key; calling out enemy positions and rotating when necessary will greatly improve your team’s chances of winning the round.